February 2024 - Lashboutiquefl

5 Top Tips To Make Your Lash Lift Long Lasting

We’ve all been there: you get that oh-so-amazing lash lift, feeling like a million bucks with your perfectly curled, fluttery lashes, because why not? But then, woosh! As the days pass, that va-va-voom curl starts to fade, leaving you longing for those dramatically lifted lashes again.

Wait up because there are ways to extend the life of your lash lift and keep them looking their best for longer. This blog will spill the tea on five tips of a little TLC and know-how to make lash lifts last longer and enjoy those envy-inducing lashes for weeks to come. So, grab your mascara wand (just for emergencies) and get ready to learn the secrets to long-lasting lash lift magic!

But first, for those who don’t know, let’s learn:

How is Lash Lift done?

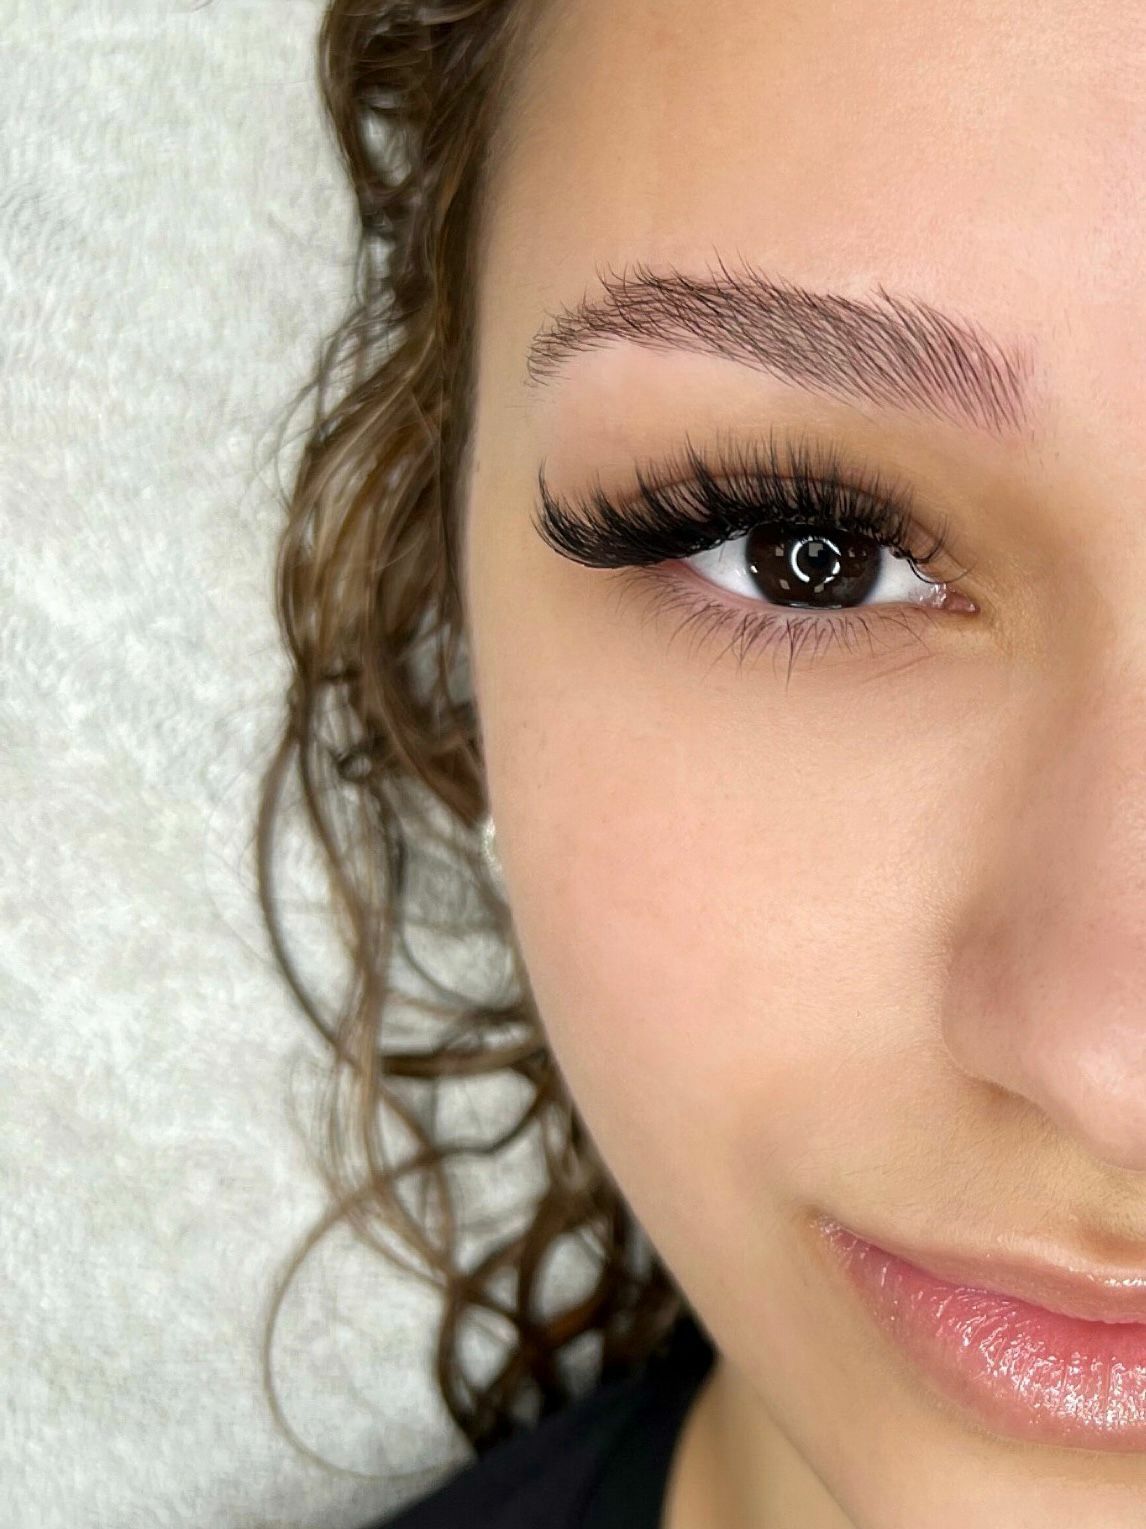
Lash lift, also known as a lash perm, is a beauty treatment designed to enhance the appearance of your natural lashes by giving them a semi-permanent curl. It’s a fantastic alternative to eyelash extensions for those who want to achieve a lifted and more awake look without the maintenance of falsies.

During a lash lift procedure, your lashes are carefully curled using a special solution that breaks down the bonds in the hair, allowing them to be reshaped. The lashes are then lifted and set into place using a silicone rod or shield, which helps to create the desired curl. Once the lashes are in position, a setting solution is applied to lock in the curl, followed by a nourishing serum to condition and hydrate the lashes.

The entire process typically takes around 45 minutes to an hour, and the results can last anywhere from 6 to 8 weeks, depending on your natural lash growth cycle.


Tips To Make Your Lash Lift Long-Lasting

TLC in the First 24 Hours

The initial 24 hours after your lash lift are critical for setting the foundation for a long-lasting effect. During this time, avoiding water, makeup, and steam is absolutely essential. This allows the lifting solution to set properly and ensures your lashes retain their new shape.

Here’s why this initial period is so crucial:

  • Water exposure- Water can break down the bonds formed during the lifting process, causing your lashes to lose their curl prematurely. Avoid showering, swimming, or washing your face directly for at least 24 hours.
  • Makeup application- Mascara and other eye makeup products can contain ingredients that interfere with the setting process or weigh down your lashes, affecting their lift.
  • Steam exposure- Steam from saunas, hot showers, or even cooking can loosen the bonds and flatten your lashes.

Following these simple aftercare for lash lift in the first 24 hours will significantly increase their chances of lasting longer and see that ‘eyelash lift before and after difference’.

Ditch the Oil

Oil is the enemy of a long-lasting lash lift! Oil-based products, including makeup removers, cleansers, and skin care products, can break down the bonds holding your lashes in their lifted position. To maintain your beautiful lift, opt for oil-free alternatives whenever possible.

Here are some specific recommendations:

  • Oil-free makeup removers- Look for micellar water or gentle oil-free makeup removers specifically formulated for sensitive eyes.
  • Oil-free cleansers- Choose a gentle, oil-free cleanser to remove dirt and makeup from your face without compromising your lash lift.
  • Mindful skincare- Be mindful of the ingredients in your skincare products, especially those you use around the eyes. Avoid products containing heavy oils or harsh chemicals that could potentially damage your lashes or weaken the lift.

Making these simple switches creates an oil-free environment that allows your lash lift to flourish.

Gentle Does It

Your lashes are delicate, and even more so after a lash lift. To ensure they stay healthy and maintain their lift,  gentle handling is crucial. Here are some practices to avoid:

  • Rubbing your eyes- This is a common habit, but it can be detrimental to your lash lift. Rubbing your eyes can disrupt the lift and potentially damage your lashes. If your eyes feel itchy, use gentle eye drops instead of rubbing.
  • Sleeping on your face- Sleeping on your stomach or side can put pressure on your lashes and cause them to lose their curl. Aim to sleep on your back to minimize friction and maintain the lift.
  • Using an eyelash curler Once you’ve had a lash lift, you likely won’t need an eyelash curler anymore. Using one can damage your lashes and potentially break the bonds holding them in place.

Being gentle with your lashes and avoiding these practices you’ll contribute to their health and longevity, allowing you to enjoy your lash lift for longer.

Nourish and Condition

Just like any other hair on your body, your lashes benefit from proper nourishment and conditioning. To keep them healthy and support the longevity of your lash lift, consider incorporating lash serums or conditioners into your routine as a mandatory lash lift aftercare.

Look for products specifically formulated for use after lash lifts. These products often contain ingredients like peptides, vitamins, and biotin, which can help:

  • Strengthen and nourish lashes- This promotes overall lash health, making them less prone to breakage and contributing to a longer-lasting lift.
  • Enhance lash growth- While lash lifts don’t affect lash growth, healthy lashes are more likely to grow longer and fuller, further enhancing the lifted effect.

Remember, consistency is key! Apply your chosen lash serum or conditioner as directed, typically once or twice daily, to see the best results.

Sleep Like a Beauty

A good night’s sleep is one of the essential lash lift aftercare instructions for overall health and well-being, and it can also play a role in the longevity of your lash lift. Here’s how your sleep habits can impact your lashes:

  • Sleeping on your stomach or side- These positions can cause your lashes to rub against your pillowcase, leading to friction and potentially flattening the lift.
  • Using a cotton pillowcase- Cotton pillowcases can be abrasive and snag on your lashes, contributing to breakage and affecting the lift.

To minimize friction and maintain your lash lift, consider these tips:

  • Sleep on your back- This position keeps your lashes off the pillowcase, reducing friction and helping them retain their shape.
  • Invest in a silk or satin pillowcase- These materials are smoother and less likely to snag on your lashes, allowing them to stay lifted and comfortable throughout the night.

Incorporating these sleep practices, you can ensure your lashes stay beautifully lifted and minimize the risk of damage during sleep.

Common Concerns or Questions Regarding Lash Lift Aftercare

Que. What if I accidentally get my lashes wet?

Answer:  Don’t panic! Gently pat your lashes dry with a clean, lint-free cloth. Avoid rubbing or pulling on them.

Que. Is it normal for my lashes to feel stiff after the procedure?

Answer: Yes, this is normal. The lashes may feel slightly stiff for the first day or two as they adjust to the new curl.

Que. What if my lash lift starts to droop?

Answer:  Contact your lash technician if your lash lift starts to droop prematurely. They can assess the situation and offer advice.

Que. How long should I wait before getting another lash lift?

Answer: It’s generally recommended to wait 6-8 weeks between lash lifts. This allows your lashes time to rest and recover.

Que. Are there any side effects associated with lash lifts?

Answer: While uncommon, some people may experience temporary side effects like irritation, redness, or dryness after a lash lift. These symptoms usually subside within a few days. If you experience any side effects, consult your lash technician or a healthcare professional.

Final Touch

To sum it up, stick to those five simple tips, and your lash lift will stay fresh for much longer. This way, you can continue to enjoy those gorgeous lifted lashes for weeks. Just remember to follow these steps regularly and treat your lashes with care. By doing so, you’ll maximize the benefits of your lash lift and feel incredibly confident with your naturally stunning eyes. Remember, it’s important to choose a skilled technician like us at Lash Lift for the best results and the safety of your lashes.

And, if you’re keen on getting that perfect lash lift, why not book an appointment with us at Lash Lift Boutique?

P.S. We use only top-quality products and techniques to keep your lashes safe and stunning. Let us help you achieve your lash goals!

Why Women Over 60 Should Consider Microblading

A Blessed Age – Plus 60. An age of retirement and roam around freely as you desire, or you can still be working and be the one you want. Do not let your age define you, not even the beauty standards.

Yes, Yes, we know, this age comes with less confidence in looks, loose skin, and sparse eyebrows are the reasons. Not anymore.

Those days when perfectly arched brows were the exclusive domain of teenagers and Instagram models? Well, toss that outdated perception out the window! Today, the secret to effortlessly defined, youthful-looking brows is no longer a secret, and it’s not just for young girls! Microblading, the semi-permanent eyebrow tattoo technique that’s taken the beauty world by storm, is now making waves for a whole new 60-year-old young woman.

Yes, you read that right. Read on to discover why this little beauty secret is changing the game for women over 60.

Understanding Eyebrow Changes With Age

Women do a lot for eyebrows throughout their age. It is necessary, too! Eyebrows are very important as they frame our faces, express our emotions, and even play a role in how well we see (especially when you consider all that squinting to fill them in!). But as you gracefully enter the sixties, these loyal buddies often start showing signs of retirement. Thinning strands wave goodbye, leaving behind sparse patches. The vibrant color fades, replaced by whispers of gray. Don’t even get started on those rogue hairs mysteriously sprouting in new, unwelcome places!

These natural changes aren’t just cosmetic concerns; they can impact your confidence, too. Sparse brows can make you feel tired or even age you beyond your years. Filling them in daily can become a tedious chore, especially with unsteady hands or limited vision. And let’s not forget the frustration of smudging or sweating it all off halfway through the day. But fear not, fellow sixty-somethings! You need a solution, and we have it: Microblading for older ladies.


Why is Microblading a Solution?

Natural-looking eyebrows and defined hair strokes plus the benefit of resigning from the hassle of regular eyebrow pencil struggle. A look you are seeking without hassle, Microblading is the solution for eyebrows for older women.

But what exactly is the process that gives you ravishing eyebrows? Microblading is a semi-permanent technique that deposits pigment into the top layer of skin, creating beautiful, natural-looking brows that last. Don’t worry, and it’s not the outdated eyebrow tattoo! Gone are the days of thick, blocky lines. Microblading is all about precision and artistry, mimicking the texture and flow of real hair.

Benefits Of Microblading

Microblading isn’t just an aesthetic choice for women over 60; it’s a gateway to unlocking a renewed sense of self-expression and confidence. Here’s how this innovative technique goes beyond filling in the gaps and truly empowers:

   Enhanced Appearance:

  • Goodbye Sparse Brows, Hello Fullness: Say farewell to thin, patchy brows and rediscover the defining beauty of youthful fullness. Microblading meticulously adds realistic hair-like strokes, restoring balance and shape to your face.
  • Brighter Eyes, Brighter You: Perfectly framed brows instantly draw attention to your eyes, making them appear brighter and more expressive. It’s like illuminating your entire face with natural definition.
  • Age-Defying Polish: Forget chasing trends; microblading enhances your natural beauty, creating a polished and youthful look that reflects your inner confidence. No more harsh lines or dramatic changes, just a subtle enhancement that flatters your unique features.

    Confidence Boost:

  • Fling That Pencil Away: No more struggling with unsteady hands or blurry vision! Microblading eliminates the daily chore of filling your brows, freeing you from frustration and time constraints.
  • Effortless Beauty, Empowering Routine: Wake up with perfect brows every morning. Imagine the time and energy saved on your makeup routine – you can now focus on things that truly matter.
  • Embrace Your Authentic Self: Feeling confident in your appearance allows your inner radiance to shine through. Walk into any room with renewed self-assurance and own your beauty, regardless of age.


    Practical Advantages:

  • Active Lifestyle, Flawless Brows: Are you an avid traveler or fitness enthusiast? Microblading stays with you through sweat, rain, and even swims, ensuring you always look your best, no matter your activities.
  • Smudge-Proof Confidence: No more worrying about smudged or faded brows. Microblading is water and smudge-proof, giving you peace of mind and the freedom to enjoy life to the fullest.
  • Improved Vision, Enhanced Life: For some, sparse brows can obstruct vision. Microblading fills in those gaps, potentially making it easier to see without glasses or contacts, adding another layer of practicality to its benefits.

Myths Must Be Dispelled


But wait, isn’t this some painful, invasive procedure? Nope! Just like this one, there are many other popular myths that block you from getting microblading. Here, we are dispelling them and bringing you the Truth.

Myth 1: Microblading is painful.

  • Dispelling the myth: While some discomfort is possible, numbing cream ensures maximum comfort. Many describe the process as ticklish rather than painful.

Myth 2: Microblading results look unnatural.

  • Dispelling the myth: Absolutely not! A skilled technician will work with you to design brows that compliment your features and natural hair color. The pigment fades gradually, allowing for adjustments and keeping your look fresh.

Myth 3: Microblading is just glorified makeup.

  • Dispelling the myth: While daily filling offers temporary solutions, microblading’s semi-permanent nature provides freedom from pencils and powders. Think of it as an investment in convenience and confidence, not just a beauty trend.

Myth 4: Microblading is the same as a traditional tattoo.

  • Dispelling the myth: Not quite! Microblading deposits pigment closer to the skin’s surface, resulting in a softer, more realistic look. Traditional tattoos go deeper, potentially leading to harsher lines and color changes over time.

Ditch the magnifying mirror and embrace the new era of effortless beauty. Microblading isn’t just a solution; it’s a liberation. Stay tuned as we delve deeper into its amazing benefits and how it can transform your life over 60!

A Happy Customer – Satisfied Story

Still confused? Talk to the people who have taken this beauty procedure and talk with them. You can also come to us, and we will bury your worries in the mud before you make any decision. Read what one of our happy clients says about her experience.

“Before microblading, my brows were barely there, making me feel tired and older. Now, they’re beautifully defined and natural-looking, and I wake up feeling confident and ready to take on the day! It’s truly been a game-changer.”

Lash Boutique has been in the industry for a long time. We have served happy clients and made them look their best.

Let’s End It – With New Perceptive

As you age, you start feeling and looking dull as your skin starts loosening. But the real shine and glow come out within yourself, and if you want to live your life like an aged yet young-hearted woman, grab it. Microblading eyebrows over 60 isn’t just about chasing fleeting trends; it’s about reclaiming confidence and embracing a beauty that transcends age. So, ditch the magnifying mirrors and eyebrow pencils, and we will let you ditch your age and bring back your confidence.

Book an appointment now!

The Best Eyelash Extensions Styles For Wedding

Wedding Bells!!

Are you ready to be the center of the stage?

It’s your wedding day- your special day, and you must look like a dazzling star of the day. Then you must be looking for the one thing, the hook that will be the essence of your look. Without any hassle, eyelash extensions can be your secret magic to make you look stunning and have a picture-perfect look all day long. Bridal eyelash extensions are like boosters to the overall makeup and do more than just make you look good in pictures; they also cry and sweatproof and stay put from the first glance to the last dance. 

Why Should You Get Eyelash Extensions For Your Wedding?

The girl’s plan for this day begins in her teens, maybe, or if not, from long enough time to get the perfect plan of the look. Let aside the #gram trends; the bride has the picture of the look and the simple desire to look gorgeous. Lash extensions are easy to care for and give a wonderful shape to your eyes. Extensions tick marks on the list to make you look like a stunning bride.

These extensions add length, volume, and curl to your lashes, making your eyes appear bigger, brighter, and more captivating in photos and in person. Whether you prefer a subtle, natural look or a dramatic, glamorous effect, eyelash extensions can be customized to suit your style and complement your wedding day makeup perfectly. 

Different Eyelash Extension Styles For Your Wedding Day

Your wedding day is the perfect opportunity to showcase your unique style, and your eyelashes are like a touch of expression in completing your look. From natural to glamorous, there are various eyelash extension styles to choose from. Let’s explore some of the best types of eyelash extension styles  for your special day:

  1. Natural Lash Extension:

Perfect for brides who want to enhance their natural beauty. These extensions add subtle length and volume, giving you a soft and fluttery look. They are ideal for outdoor and daytime weddings, as they look effortless yet elegant.

  1. Doll Lash Extension:

A bride who desires to be just like a doll from her childhood. These extensions create a youthful and innocent appearance inspired by the wide-eyed look of a doll. They are longer in the center of the eye, making your eyes appear larger and more open. Great for brides who want to achieve a sweet and charming look.

  1. Stylish-Glam Lash Extension:

For brides who love a bit of drama, these extensions are the way to go. They are longer, fuller, and more curled than natural lashes, giving you a glamorous and sophisticated look. Perfect for evening weddings or brides who want to make a statement with their lashes.

  1. Cat-Eye Lash Extension:

Embrace your inner feline with these extensions that are longer and more dramatic at the outer corners of your eyes. They create a lifted and elongated effect, resembling the shape of a cat’s eye. Ideal for brides who want to add a touch of seduction to their look.

  1. Wispy Lash Extension:

Achieve a soft and feathery look with wispy lash extensions. These extensions are longer towards the center of the eye and taper off at the ends, creating a natural and romantic vibe. Perfect for brides who want a dreamy and ethereal look on their wedding day.

Maintenance Tips

Your wedding day is fast approaching, and you want your eyelash extensions to look flawless. Here are some expert tips to help you care for your lash extensions before and after the big day:

  1. Avoiding Damaging Makeup Products:

Ensure your extensions last longer, and avoid oil-based makeup products, as they can break down the adhesive. Opt for oil-free products and avoid using mascara on your extensions.

  1. Proper Cleansing and Brushing Routine:

Cleanse your eyelashes daily with a gentle, oil-free cleanser to remove dirt, makeup, and oils. Use a clean mascara wand to brush through your lashes to prevent tangling and maintain their shape.

  1. Touch-Up Appointments and Refill Schedule:

Schedule regular touch-up appointments with your lash technician to maintain your extensions. Typically, touch-ups are needed every 2-3 weeks to replace any lashes that have shed and keep your lashes looking full and beautiful.

Expert Insights:

According to Kristina, our professional lash technician, “Proper care and maintenance are key to keeping your eyelash extensions looking their best. Avoiding oil-based products and following a regular cleansing and brushing routine can help extend the life of your extensions and keep them looking full and natural.”

Take Away

Eyelash extensions can be a wonderful addition to your bridal beauty regimen, uplifting your natural beauty and giving you that extra touch of glamour on your wedding day. By following the tips and advice provided, you can ensure that your eyelash extensions look flawless and last throughout your special day. Whether you opt for a natural look or something more dramatic, eyelash extensions for the wedding can help you achieve the perfect bridal look and make you feel beautiful and confident as you walk down the aisle.

Frequently Asked Questions

As a bride, there must be a lot of questions in your mind going on regarding the best bridal eyelashes! Now we will answer most questions asked by the TO-BE-BRIDES.

  1. When Did You Get Eyelash Extensions Before a Wedding?

It’s recommended to get eyelash extensions 2-3 weeks before your wedding day. This allows enough time for any adjustments or touch-ups needed and ensures your lashes look perfect on your special day.

  1. Can You Still Wear Eye Makeup?

Yes, you can still wear eye makeup with eyelash extensions, but it’s best to use oil-free products and avoid waterproof mascara. Be gentle when removing makeup to avoid damaging the extensions.

  1. Eyelash Extensions vs False Lashes for a Wedding?

Eyelash extensions are a better option for weddings as they look more natural and last longer. They are individually applied to your natural lashes, giving a fuller, more seamless look compared to strip false lashes.

  1. Can You Customize the Look of Your Eyelash Extensions?

Yes, you can customize the look of your eyelash extensions. You can choose the length, curl, and volume based on your preference and desired look. As your lash technician, we will help you select the best style for your wedding day.

  1. Can I Shower or Swim with Eyelash Extensions?

Yes, you can shower and swim with eyelash extensions, but it’s best to stay away from excessive exposure to water for the first 24 hours after application. After that, be gentle with your lashes and pat them dry instead of rubbing them.

The What, When, and How of Eating After Lip Blush

What do you eat after lip blush? Is spicy food off-limits? Are sour foods okay? Glossy noodles? The questions can be endless and confusing. Remember, since it’s a lip treatment, what you put in your mouth plays a main role in achieving those perfect, kissable results.

Don’t worry about figuring it out on your own. We’re here to help! This blog will guide you through the “what,” “when,” and “how” of eating after your lip blush procedure. So, everyone, put down that spicy burrito and read on for the delicious (and not-so-delicious) food secrets to nourish your lips to their best.

The What

Now, the first thing is what should be on your plate to provide the necessary nutrients to support your lip-blushing recovery. Keep in mind that gentleness and nourishment are key.

Foods to prioritize

Eat Soft and Smooth Foods: Choose foods that are soft and smooth, like yogurt, pudding, mashed potatoes, and smoothies. These foods are easy to eat and won’t make your lips work too hard.

Stay Hydrated: Eat foods with lots of water, such as watermelon, cucumber, and oranges. Soups and broths are good choices, too. These keep your lips moist and help with healing.

Go for Nutrient-Rich Foods: Eat foods with lots of good stuff for healing. Foods with vitamins A, C, and E, as well as zinc and protein, are great. Think about leafy greens, berries, avocados, nuts, and fish. They all help your lips heal and stay healthy.

The When 

Even queens need to follow the rules, and when it comes to post-lip blush feasting, timing is just as important as the “what” goes on your plate. Here are some guidelines to follow during the lip blush healing stages:

Immediately After the Procedure

In the first few hours, opt for gentle, cool liquids to soothe your lips. As you start feeling better, you can gradually introduce soft, bland foods to your diet.

Days 1-3

During these initial days, focus on eating soft and non-irritating foods to give your lips the chance to heal properly. Remember to continue using a straw for drinks to minimize contact with your lips.

Days 4-7

As you progress through the first week, you can slowly diversify your diet by reintroducing more variety. However, be cautious and attentive to any foods that might cause irritation to your lips.

Week 2 and Beyond

By the second week, most dietary restrictions can be lifted, but it’s necessary to keep an eye on your lips for any signs of sensitivity. While you can enjoy a wider range of foods, it’s still important to prioritize your lip health and avoid anything that might disrupt the healing process.

The How

Finally, let’s talk about the “how” because how you handle things matters too! Here are some gentle practices to make sure your recovery is smooth and comfy:

Eating Techniques

  • Use a fork and knife whenever you can. It’s a bit gentler than biting directly into your food.
  • For the first few days, sip your drinks through a straw. This way, you won’t need to make direct contact with your lips.

Hygiene

  • After meals, give your lips a gentle rinse with water. Pat them dry with a clean cloth afterward.
  • Try not to touch or rub your lips too much. They need a bit of peace to heal properly.

Hydration

  • Keep yourself hydrated by drinking plenty of water throughout the day. It’s good for your overall health and helps with the healing process.
  • Use a gentle lip balm to keep your lips moist. This adds an extra layer of protection and comfort during the recovery period.

Additional Lip Blush Aftercare Tips

Cleanliness and Moisture

Prioritize cleanliness and moisture. Keeping your lips clean and moisturized is important for optimal healing. You can gently clean them with water and apply a soothing lip balm to keep them hydrated and comfortable throughout the day.

Sun and Activity Avoidance

it’s wise to avoid sun exposure and strenuous activities, especially during the initial healing period. Direct sunlight can slow down the healing process and may cause discomfort, so it’s best to shield your lips from excessive sun exposure. Additionally, taking it easy on activities that could put stress on your lips will give them the time they need to heal properly.

Scab and Rubbing Avoidance

Resist the urge to pick at any scabs that form on your lips. Picking at scabs can lead to potential damage or scarring, so it’s important to let them come off naturally. Similarly, try to avoid rubbing or touching your lips too much, as this can irritate them and slow down the healing process.

Communication with Your Technician

Lastly, maintain open communication with your technician throughout the healing process. If you have any concerns or questions, don’t hesitate to reach out to them for guidance and support. They’re there to help you every step of the way and can provide valuable advice tailored to your individual needs.

Sample Meal Plans In Case You Need It 

Day 1-3: Initial Recovery Phase

Day 4-7: Continued Healing Phase

Week 2+: Advanced Healing Phase

Breakfast: Breakfast: Breakfast:
Greek yogurt with honey and mashed bananas Oatmeal with sliced bananas and a drizzle of maple syrup Scrambled eggs with sautéed spinach and whole-grain toast
Snack: Snack: Snack:
Fruit smoothie with spinach, berries, and almond milk Cottage cheese with sliced peaches Greek yogurt with granola and mixed berries
Lunch: Lunch: Lunch:
Creamy vegetable soup with soft bread rolls Chicken noodle soup with soft, cooked noodles Quinoa salad with grilled chicken, avocado, and mixed greens
Snack: Snack: Snack:
Applesauce or mashed avocado on toast Hummus with cucumber and carrot sticks Smoothie bowl with blended mango, banana, and coconut milk topped with nuts and seeds
Dinner: Dinner: Dinner:
Baked salmon with steamed vegetables and quinoa Turkey meatballs with mashed sweet potatoes and green beans Grilled shrimp skewers with roasted vegetables and wild rice
Dessert: Dessert: Dessert:
Chilled fruit salad with watermelon, cantaloupe, and honeydew Rice pudding with cinnamon and raisins Dark chocolate squares with sliced strawberries

Takeaway

No matter how long does the lip blush lasts, remember that beautiful lips start with mindful aftercare. By following these guidelines and treating your lips with care, you’ll be flaunting your gorgeous pout in no time.  For personalized advice, consult with us at Lash Boutique, and we promise to serve you with the best.

If you’re looking to get lip blush to achieve the perfect pout, contact our team of experienced professionals today to schedule a consultation and learn more.