June 2025 - Lashboutiquefl

Is Brow Lamination Safe for All Skin Types? What You Need to Know

Brows frame the face shape. That’s even the smallest of changes, like brushing them up or shaping them, can make a big difference. Brow lamination has quickly become one of the most in-demand salon services for that reason. Fuller brows, better shape, and even less time in front of the mirror – who does not want that in the early morning hustle

However, when it sounds like this perfect fix, one question keeps coming up: can everyone do it safely?

Is it safe for all skin types? Let’s explore what really matters before your next appointment.

What Is Brow Lamination?

Brow lamination is a professional treatment that relaxes and resets brow hairs using a gentle chemical solution. Once softened, the hairs are brushed into your desired shape and set in place. The results are sleek, even, and naturally fuller brows that stay put for 4–6 weeks.

At Brow Lamination in Sarasota studios, experienced technicians personalize the process for different brow shapes and skin types.

What Makes It So Popular?

The rise of laminated brows isn’t just a trend—it’s a solution. Among the many benefits of brow lamination, here are a few:

  • Fuller, lifted brows
  • No need for makeup or gels
  • Painless and quick
  • Easy maintenance
  • Custom results

Want next-level results? Pair lamination with professional brow shaping in Sarasota to achieve a defined, balanced finish.

Is Brow Lamination Safe for All Skin Types?

Here’s the short answer: For most people, yes. But results and reactions can vary depending on your skin type. Here’s what that might look like:

Normal Skin

The “easy-going” type—usually no issues at all. The lamination product sits well, and results last longer.

Dry Skin

Dry patches or tightness may show up if the skin is not prepped properly. Using a hydrating serum afterwards can help.

Oily Skin

Oil may affect how long the results last, but the treatment itself is still safe. Brow artists may tweak the formula to suit.

Combination Skin

Your brows may be in the oily zone while the rest of your skin is dry. With the right prep, this isn’t usually a problem.

Sensitive Skin

Caution here! A patch test is a must. If you’ve had reactions to skincare before, always let your technician know.

Situations Where Brow Lamination May Not Be Ideal

There are a few cases where lamination should wait:

  • Red, broken, or sunburnt skin
  • Recent chemical peels or facial treatments
  • Use of retinol or strong exfoliants near the brow area
  • Active eczema, psoriasis, or dermatitis in the area
  • Known allergies to similar products

A consultation with a qualified brow technician helps avoid any risks. Most salons for brow lamination in Sarasota offer detailed consultations for first-timers.

Are There Any Side Effects of Brow Lamination?

Although rare, some side effects include:

  • Redness or sensitivity
  • Slight dryness around the brow area
  • Mild irritation in sensitive skin
  • Over-processed brow hair (only if done incorrectly)

These can often be avoided with experienced care and proper aftercare products.

Tips for Pre & Post-Treatment Care

Before Treatment:

  • No exfoliating near your brows 2–3 days prior
  • Skip retinol or active skincare
  • Don’t wax or tweeze right before the appointment

After Treatment:

  • Keep brows dry for 24 hours
  • Don’t touch, rub, or apply makeup right away
  • Use a nourishing oil or serum to hydrate brows
  • Avoid steam rooms or intense workouts for a day

What to Expect Before and After Eyebrow Lamination

After the brow lamination, one can expect a noticeable lift and structure, especially if your natural brows are sparse or grow unevenly. Eyebrow lamination before and after transformations often shows fuller, fluffier brows with a cleaner arch and defined shape.

Some clients return every 5–6 weeks for touch-ups, especially those who enjoy a more consistent, ready-to-go brow look.

Final Thoughts: Is It Right for You?

Brow lamination can do wonders for shaping and fullness, but skin type does matter. If your skin is generally balanced and healthy, it’s likely a great match. If your skin is on the sensitive side, a patch test and a personalized approach make all the difference.

Whether it’s your first time or you’re ready for a brow refresh, go with a salon that understands your skin. At Lash Boutique, we our known for our expert team and skilled work. We often pair expertise with gentle products to give you results that not only look good, but feel good too.

Book your appointment with us.

Lash Mapping – What Is It And What Does It Involve?

Not all eyelash extensions are created equal. Some look stunning and effortless, like they are meant for that face. You have probably seen the art of lashes that open up the eyes, lift the face, and somehow just work perfectly.

That’s not just a lucky lash tech. That’s lash mapping.

If you have never heard of it, don’t worry. It sounds technical, but really, it is just planning. Good, smart, thoughtful planning that makes your lash extensions look 10x better (and feel better, too).

Let’s break it down in a way that actually makes sense. No complicated talk. Just the stuff you need to know—whether you are someone getting lashes or someone learning how to do them.


What Is Lash Mapping?

Okay, here is the deal. Lash mapping is a way for your lash artist to figure out what goes where before applying a single lash.

Your eyes are divided into sections. The artist decides what length, curl, and thickness should go in each one. All of this is based on how your eyes are shaped, what kind of look you want, and how strong your natural lashes are.

Think of it like this: your face has its own little blueprint. Eyelash mapping follows that, so your lashes look balanced and custom-made natural lash extensions. No guessing. No one-size-fits-all mess.


Why Does Lash Mapping Matter?

Because it makes a big difference, a difference can be felt by the client, and it makes the process easier and smoother for the artist.

Here is what happens without mapping:

  • One eye ends up looking slightly different than the other.
  • Lashes feel heavy in weird spots.
  • Or the whole thing just looks “off.”

Now, here is what happens with mapping:

  • The set suits your eye shape.
  • It’s even on both sides.
  • You get that clean, lifted, face-brightening look everyone loves.

Plus, lash mapping helps protect your natural lashes. The artist can see where to go softer or shorter so they don’t overload weak spots. (Yep—lash health matters too.)


What’s Included in a Lash Map?

A lash map usually includes:

  • Lengths – Shorter near the inner corners, longer in the middle or outer sides, depending on your style.
  • Curls – Some curls are soft and natural (like a C curl), while others are more dramatic (like a D curl).
  • Thickness – If your natural lashes are strong, you can go thicker. If not, lighter lashes are safer.
  • Eye zones – The lash line is split into zones, kind of like sections on a graph. Each one gets its own lash “plan.”

Some lash artists draw this out on under-eye pads or stickers. Others just know the zones in their head (but trust us—mapping is still happening behind the scenes).


Lash Styles, You Can Map Out

Now, this is where it gets fun – lash mapping styles.

There’s no one “right” lash style. It’s all about what fits your eyes and what kind of vibe you are going for.

Here are a few common lash map styles:

  • Classic/Natural – Follows your natural lashes, just enhances them. Great for an everyday look.
  • Cat Eye – Starts shorter and gets longer toward the outer edge. Makes eyes look wider or more lifted.
  • Doll Eye – The longest lashes go in the center. Opens up the eyes and gives a bright, rounded effect.
  • Squirrel Style – Sort of a mix between natural and cat eye. Tapered edges, but with more balance.
  • Wispy or Hybrid – Random longer lashes mixed in for texture. Trendy and very Instagram-worthy.

If you don’t know what suits you, do not stress. That is your artist’s job. A good one will look at your face and guide you through it.

What Happens During Lash Mapping?

It’s not a big, dramatic process. It’s more like quiet prep work before the fun begins.

Here’s how it usually goes:

  1. Consultation – You talk to your artist about what kind of lashes you want. Natural? Bold? Somewhere in between?
  2. Eye Check – They will look at your eye shape, lid space, and natural lashes. (It’s not judging—it’s planning.)
  3. Choosing Products – The artist picks the curl, length, and thickness based on your goals and lash health.
  4. Drawing the Map – They mark your under-eye pad or mentally section out your lash lines like little dots or numbers for different zones.
  5. Applying the Lashes – Now comes the real work. They follow the map and adjust as they go, so everything stays balanced.
  6. Final Look Over – A quick check to make sure both eyes match. Maybe a few tweaks here and there.

Is Lash Mapping Only for Pros?

Short answer? No.

If you are just starting out as a lash artist, lash mapping is actually a huge help. It keeps you from winging it—and trust the professionals; “winging it” can go wrong fast.

Here are some beginner tips:

  • Use pre-made templates or stickers.
  • Stick to one curl at first.
  • Start with basic maps like classic or cat-eye.
  • Practice, practice, practice.

For pros, lash extension mapping gets more personal. They’ll combine curls and layer styles and adjust things based on what works. But it all starts with the basics. So don’t skip it.

Clients Can Tell the Difference (Even If They Don’t Know Why)

Most clients don’t walk in asking for a “lash map.” But they do walk out saying:

  • “These lashes feel lighter than before.”
  • “My eyes look more open.”
  • “I didn’t even need eyeliner!”

That’s what a good lash map does. It makes the lashes look like they were meant for that face. Like they’re just… right.

So yes—it makes a difference. And clients can feel it (even if they don’t know what went into it).

One Last Thing…

Lash mapping is not about being extra fancy. It is about making sure every lash has a reason to be where it is.

At Lash Boutique, we don’t just glue lashes and hope for the best. We plan. We measure. We think about your face shape, lash health, and what makes you feel confident.

Every set we do is mapped just for you because it is one-size-fits-all. Not our thing.

Ready for lashes that look like they belong on your face? Book your next set with us—where every lash is placed with purpose.

Is Lash Lift Right for Young Adults, Brides, or Moms? A Breakdown by Life Stage

“Is it safe for my daughter?” “Should I get one before my wedding?” “Can I do this while breastfeeding?”

We hear these exact questions at our salon almost every week.

The truth is, lash lifts can work wonders, but you should understand that what’s right for an adult isn’t always ideal for a mom juggling a toddler. And brides?

They’ve got a whole different checklist. Whether you’re considering a lash lift in Sarasota or still Googling “lash lift near me,” knowing when and how to get it matters.

And if you’re torn between a lift and eyelash extensions, or wondering what the before and after lash lift really looks like, this blog clears it all up.

Let’s take a look.


What Is a Lash Lift and How Does It Work?

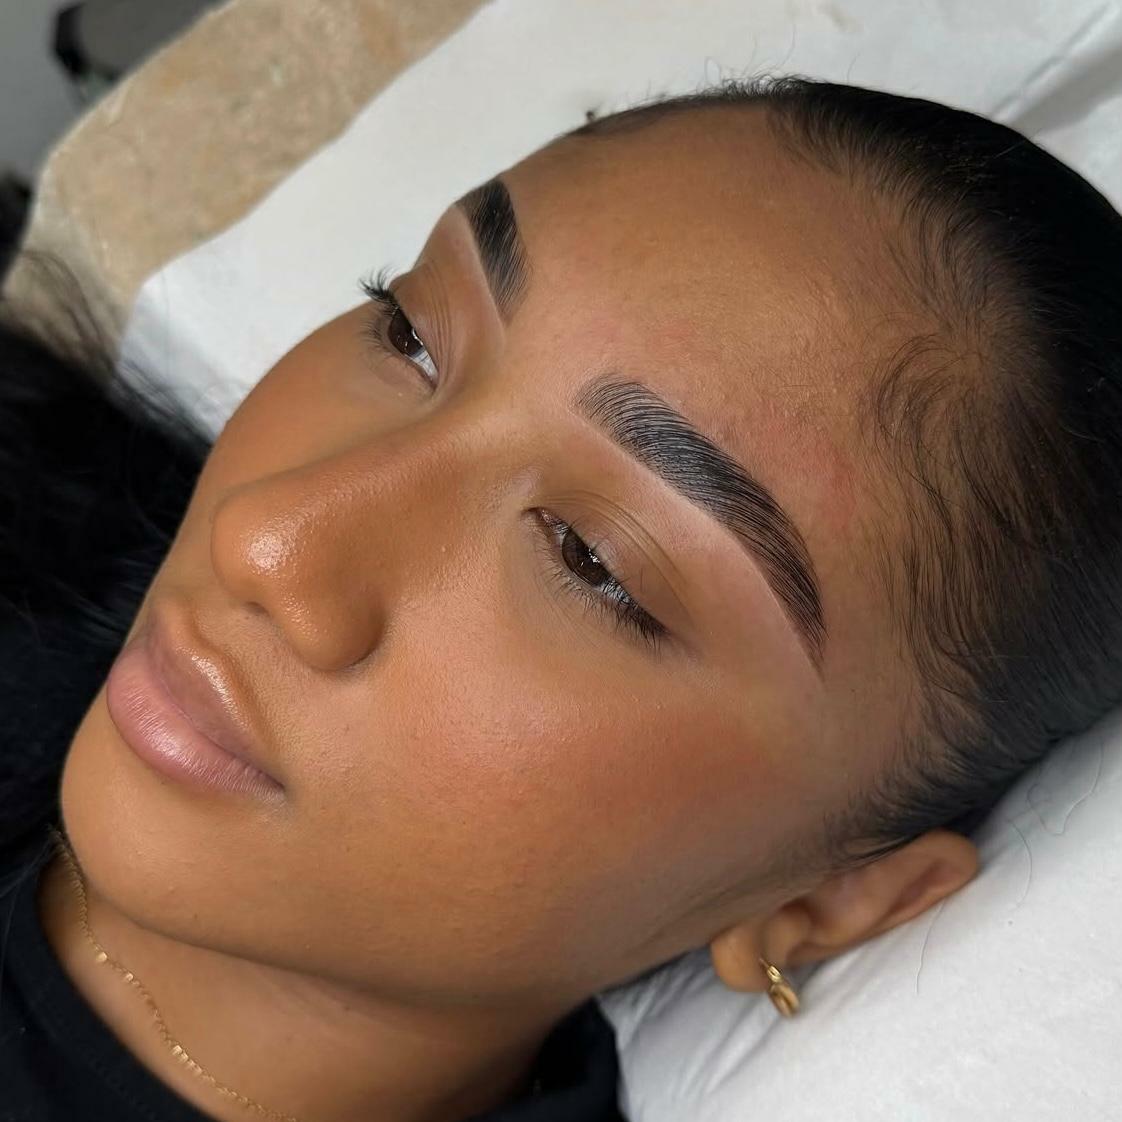
So, lash lift—what is it really? In short, they give your lashes a long-lasting curl from the base, so your eyes look brighter and more lifted. Before starting, your lash expert takes a look at your natural lashes to pick the perfect curl and shape for you.

Next is the actual lash lift procedure.
Your lashes are placed over a soft silicone shield, and a lifting solution is applied to shape them. A second solution sets the curl in place. Some clients choose to add a lash tint for a darker, more defined finish—that part is completely optional, but often enhances the look.
The treatment takes about 45 to 60 minutes and is completely painless. You’re relaxed with your eyes closed the entire time.

The results?
It usually lasts 6 to 8 weeks, depending on your natural lash growth cycle and how well you follow the lash lift aftercare, because it really matters.


What Before and After Lash Lift Really Looks Like

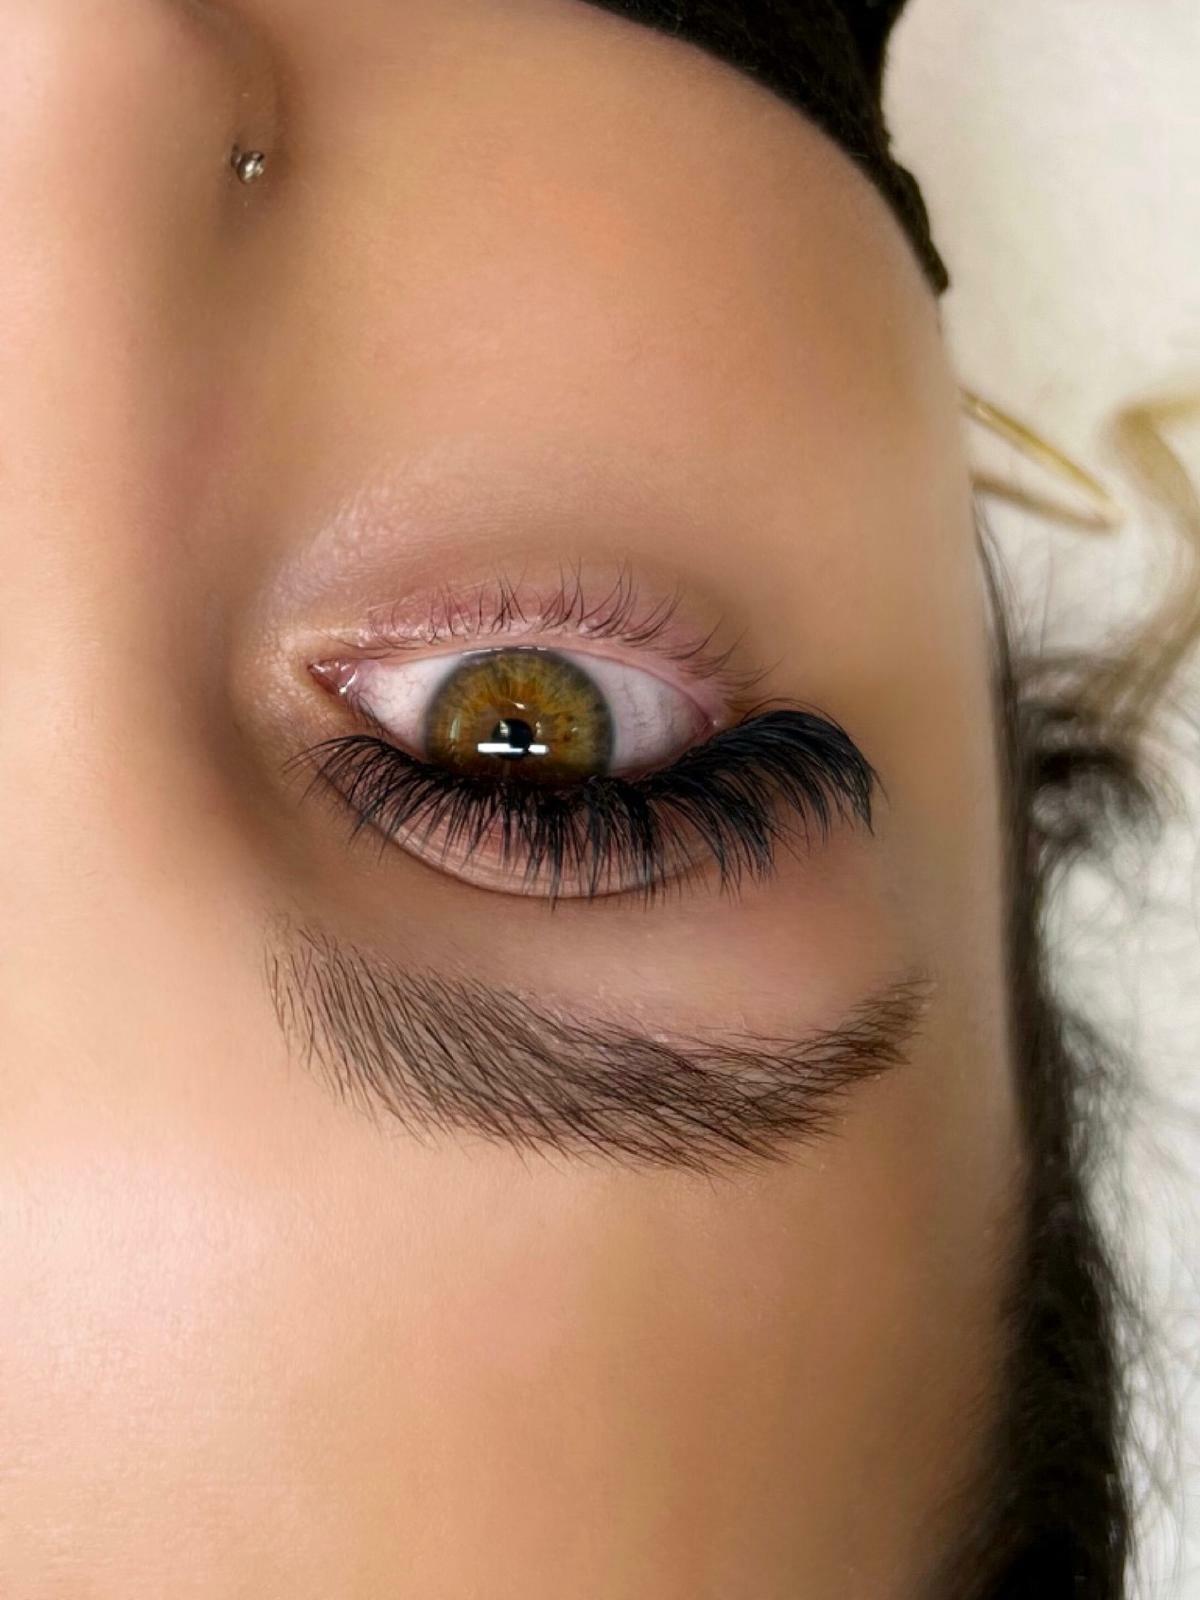
Before a lash lift, most natural lashes tend to point downward or sit flat. They’re easy to miss, even if they’re long. Nothing wrong with that, but they don’t exactly make your eyes pop.

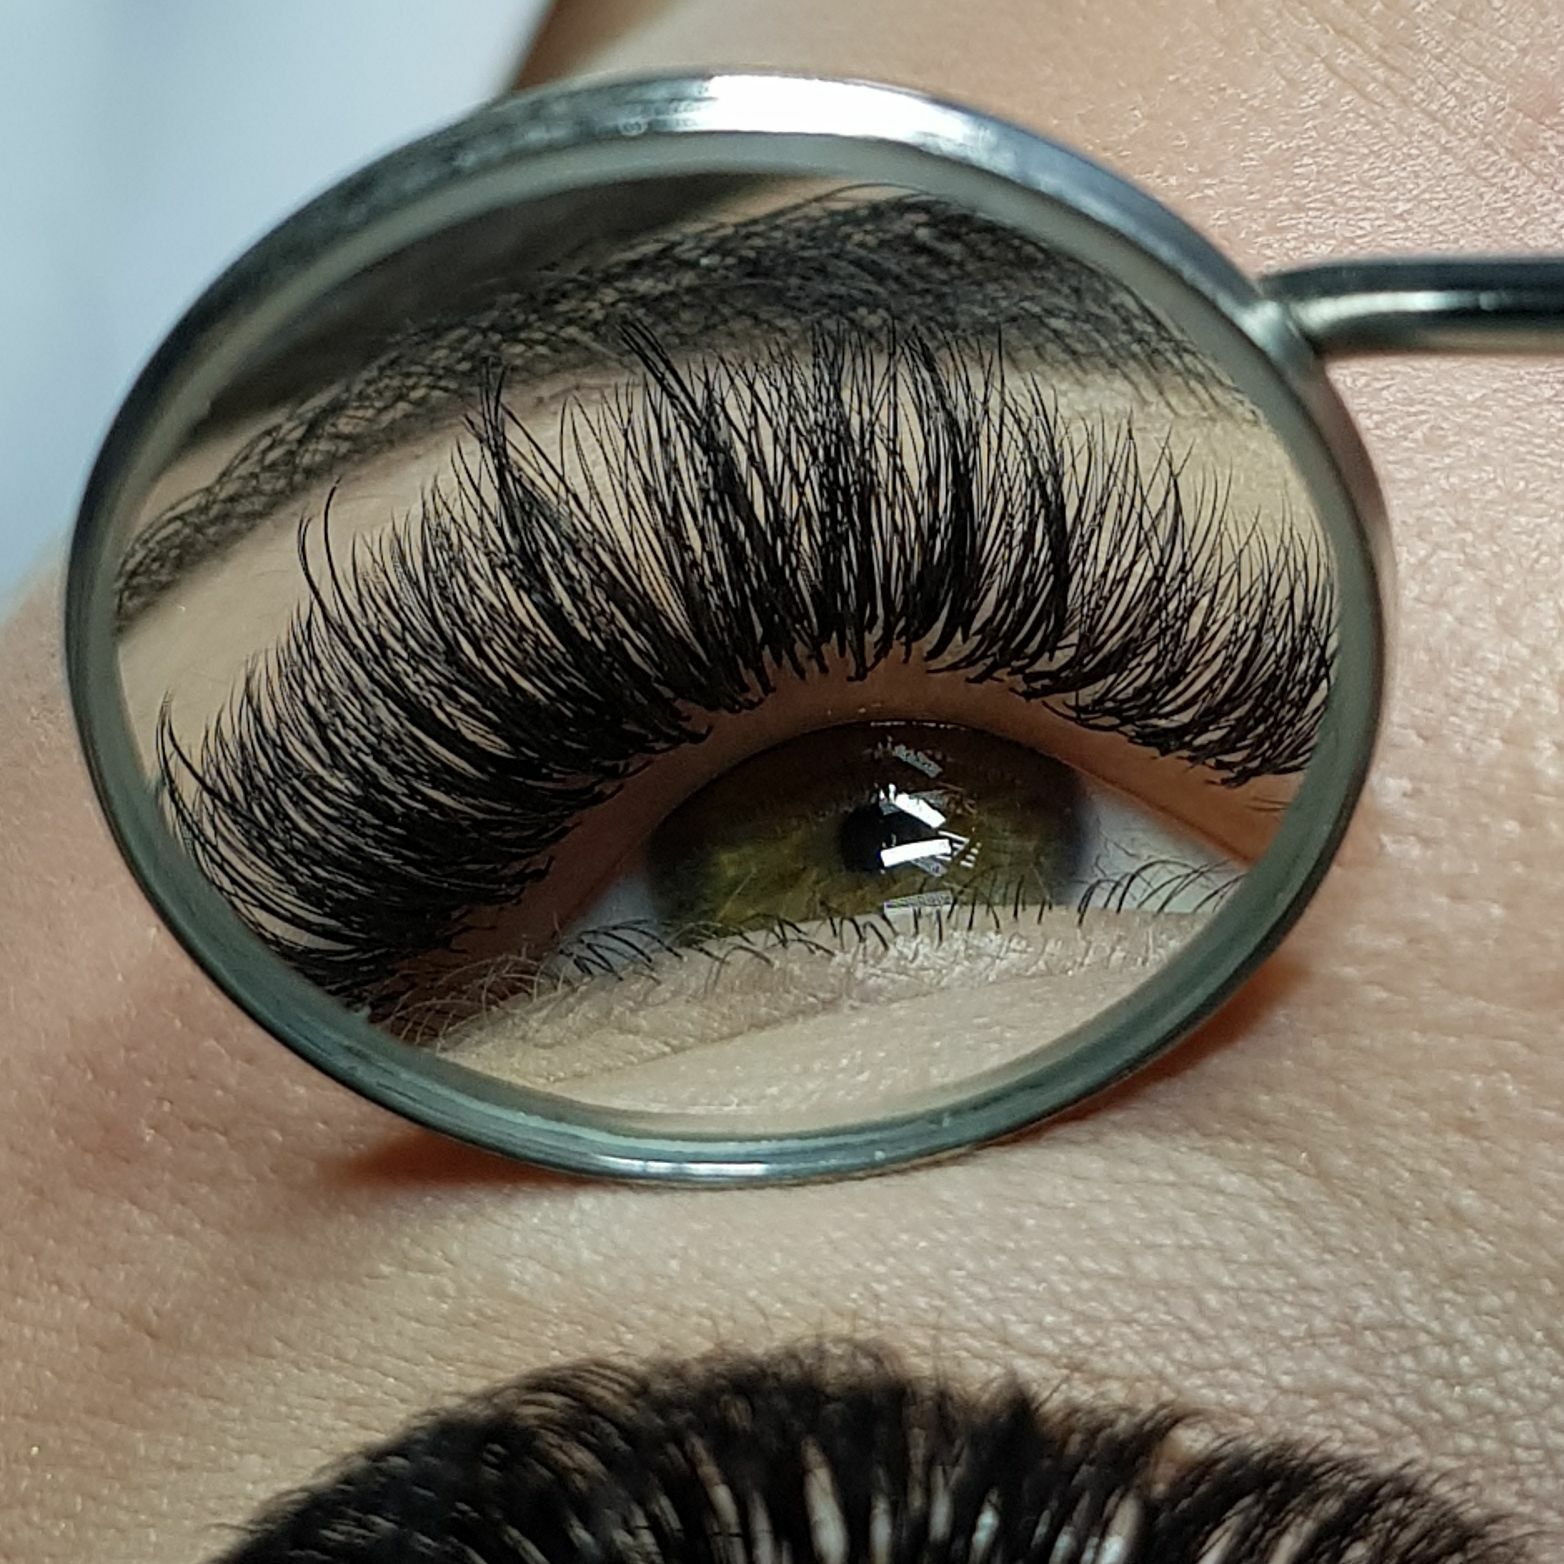
But post-lift? Your lashes look longer, fuller, and more defined. Your eyes appear brighter and more awake, almost like you’ve got mascara on (without lifting a finger). If your lashes are straight, light, or barely noticeable, the transformation is even more dramatic.

Here’s what people usually notice after a lash lift:

  • Eyes appear wider and more open
  • Lashes look naturally curled and lengthened.
  • No need for a lash curler or daily mascara
  • Minimal to no maintenance between sessions
  • Even better results if combined with a tint


Lash Lift for Young Adults

Because You’ve Got Better Things to Do Than Curl Your Lashes

Your schedule’s packed. Maybe you’re building your career, studying hard, or managing a little bit of everything. Whatever you’ve got going on, a lash lift keeps your lashes in check so you don’t have to. One less thing to think about when you’re already racing the clock each morning.

It’s perfect if you’re just getting into beauty treatments and want something easy, safe, and natural. No glue, no extensions, no complicated upkeep. Just your own lashes, lifted and curled so it looks like you’ve made an effort… even if you haven’t.

You’ll love it if:

  • You’re tired of daily mascara.
  • You want something low-effort that fits your busy schedule.
  • You want to look put-together in real life and on camera.

Things to Know

1. Your Lashes Are Usually in Great Shape
At this age, your lashes are often healthy and strong, ideal for a successful lift. Your lash artist can choose a curl level that enhances your eyes without looking overdone.

2. Perfect for First-Time Lash Treatments
If you’ve never had a lash service before, this is a gentle, beginner-safe option. The formula used is designed to be kind to your natural lashes while still giving great results.

3. Lifestyle-Friendly
Between late nights, workouts, and early meetings or classes, this treatment holds up. No flaking, no running mascara—just naturally lifted lashes that stay put.

Most Common Questions Young Adults Ask Us:

1. Is it safe if I’ve never had a lash treatment before?
Yes! It’s a simple, non-invasive treatment with no glue or falsies involved.

2. How long does it last if I have a busy schedule?
Typically 6 to 8 weeks, depending on your natural lash cycle and how well you care for them.

3. Can I still wear eye makeup after?
Absolutely. Just wait 24 hours post-treatment, and stick to oil-free products to help your lift last longer.


Lash Lift for Brides

A Must-Have or a Wedding Risk?

Tears, heat, endless photo ops. Weddings sure put your lashes through it all. And when you’re the bride, you don’t want to deal with flaky mascara or false lash glue midway through your vows. That’s why more and more brides are leaning toward the lash lift procedure to keep things clean, low-maintenance, and, honestly, stunning.

Why Brides Love It:

  • No smudging or flaking, even if you cry happy tears
  • Your natural lashes look lifted and fuller in all those close-up HD shots.
  • You’re covered for everything from wedding functions to honeymoon selfies.
  • No heavy lash strips or poking corners, just your own lashes looking their best

Important Timing Tips

1. Book a Trial First
Do a test run at least a month before the wedding. This helps you see how your lashes react and lets your artist adjust the curl level to match your makeup look.

2. Schedule the Final Lift 5–7 Days Before
Don’t wait until the last minute. A few days before the event gives your lashes time to settle into their final shape, which looks more natural and holds better under makeup.

3. Add a Lash Tint for Extra Depth
If your lashes are light or sparse, go for a tint with your lift. It gives that mascara effect without the mess (or the need to reapply anything between functions).

Most Common Questions Brides Ask Us

1. Lash lift or extensions for the big day?
If you want something more natural, low-effort, and less fussy, go for the lift.

2. Will my MUA be okay with it?
Absolutely. The curl actually makes eyeshadow and liner pop more in photos.

3. How soon before the wedding should I do it?
Ideally, 5 to 7 days before. Just don’t try it for the first time the night before!


Lash Lift for MOMS

Being a mom means quick showers, one-handed meals, and barely enough time to brush your hair, let alone curl your lashes. That’s where a lash lift comes in. It gives you that fresh-faced, wide-eyed look the minute you roll out of bed (yes, even if you didn’t sleep much).

Why It’s a Game-Changer:

  • You skip daily mascara but still look awake and refreshed
  • It complements the “no makeup” makeup look moms love
  • Postpartum or not, it’s a 45-minute break that doubles as self-care
  • Perfect for busy mornings, daycare drop-offs, and surprise video calls

Real-World Considerations

Hormonal Changes Can Affect Results
If you’re pregnant or nursing, your hormones might affect how well the lash lift holds. Results can vary, and that’s totally okay.

The Struggle Is Real
Oil-based products and constant eye rubbing? Not ideal. But when you’ve got sticky fingers poking your face 24/7, it’s something to be aware of.

Make Space for Aftercare
You’ll need to keep your lashes dry and untouched for about 24–48 hours after the lash lift procedure. Plan it on a day when the chaos level is lower (we know that’s rare, but worth a try).

Most-Asked Questions by Moms at Our Salon

1. Can I get it while breastfeeding?
Yes, but always ask your doctor.

2. Will it still work during pregnancy?
Maybe. It depends on your body.

3. How do I keep it looking fresh?
Gentle care, and a little luck with the kids not jumping on your face.


Lash Lift vs Eyelash Extensions- Which Life Stage Prefers What?

Not sure which one suits your stage of life? Here’s a quick comparison.

Life Stage Lash Lift Extensions
Young Adults ✔ Light, safe ✘ Too heavy/expensive
Brides ✔ Natural look, no mascara smudging ✔ Great for full glam looks
Moms ✔ Low-maintenance, time-saving ✘ Time-consuming upkeep


Lash Lift Aftercare Tips That Actually Work Based on Your Life Stage

Aftercare Tips for Young Adults

  • Avoid heavy eye makeup for at least 24 hours after the lash lift.
  • Skip sweaty sports or activities that could get your lashes wet.
  • Don’t rub your eyes during school or while removing makeup.

Aftercare Tips for Brides

  • Steer clear of water, steam, and yes, even emotional tears for 24 to 48 hours.
  • Avoid using lash serums or curling tools on the day of the big event.
  • Plan a tint touch-up 5–7 days before the wedding for maximum definition.

Aftercare Tips for Moms

  • Stick to gentle, oil-free cleansers during your skincare routine.
  • Keep tiny hands away from your face (we know that’s not easy!).
  • Comb your lashes softly each morning with a clean spoolie to keep them neat and lifted.


Before You Book: Final Thoughts from Kristina

Hey, I’m Kristina, owner of Lash Boutique and your go-to lash and brow artist here in Sarasota. After 9+ years in the beauty world, here’s what I always tell my clients before booking a lash lift:

Not every lash is ready. If your lashes are super short, brittle, or damaged (maybe from too much curling or old mascara), your lashes might not be ready for a lift just yet. Sometimes, your lashes just need a little TLC first.

Consultation matters. It’s not just a step. It’s how I get to know your lashes. Your natural lash type, your daily routine, and even your hormones can affect how the lift turns out. We figure that out together.

I’ll always keep it real. If a lash lift isn’t the best move for you, I’ll say so. My job isn’t to push a treatment, it’s to help you feel confident in your own lashes.
Come with questions, inspo pics, or concerns. I’ve seen it all, and I’m here to help.

Ready when you are. Book your lash lift in Sarasota with me at Lash Boutique, and let’s make your lash goals happen.

Guide to Safely Wear Eye Makeup with Lash Lift and Brow Lamination

So, you’ve just treated yourself to a fresh lash lift and brow lamination—aka the dream team for low-effort, high-impact eyes. Your lashes look lifted, your brows are laminated to perfection, and you’re probably thinking, “Okay… can I still wear my go-to eyeliner or eyeshadow now?” Totally fair question.

The thing is, it’s not just what you use. It’s how you use it.

Most people assume they can just slap on their regular eyebrow makeup or swipe off mascara like they always did, but no, that’s how you end up with sad, crinkly brows or lash lift falling down faster than they should.

No matter if you’re new to eyebrow lamination or a regular in the lash chair, there’s a bit of a learning curve when it comes to your makeup routine after these treatments. But don’t worry; we’re not here to make you overthink every swipe, just a few smart tweaks to keep your brow lamination and lash lift looking fresh for longer.

Let’s break down exactly what to do and what to totally avoid when wearing eye makeup with your new lash and brow look.

Before You Start, Know What You’re Working With

Before we dive straight into your regular makeup routine, let’s pause for a second. Know that these aren’t just regular beauty treatments. They’re more like “handle with care” kind of situations.

  • With a lash lift, your natural lashes are curled up and set using a special solution. It gives you that wide-awake, mascara-without-the-mascara look. But right after the treatment, your lashes are basically in their “do not disturb” phase. Applying too much eye cream or even just letting them get wet in the first 24 hours? That can totally relax the curl—like your lashes just gave up halfway through the week.
  • Now for eyebrow lamination. This treatment brushes your brow hairs up into place and locks them there. It’s perfect for that fluffy, full look everyone’s into right now. But if you start piling on product or pressing too hard with your makeup brush, you’ll flatten the shape you paid for. Not to mention, your brows could start looking like they had a rough night out.

Makeup Items to Skip After a Lash Lift or Eyebrow Lamination

For Lash Lifts (Especially Right After Your Appointment)

  • Oil-based eye makeup removers – These are a big no right after a lash lift. Oil can mess with the setting solution and cause your lashes to lose that lifted shape faster than they should especially if you’ve had a lash lift in Sarasota where humidity can already challenge the longevity of the results.
  • Fiber mascaras – While they may seem like a quick fix for volume, the fibers often weigh down lifted lashes, which can lead to premature fallout or distortion.
  • Waterproof makeup – Mascara or eyeliner labeled waterproof may sound like a smart choice for staying power, but the removal process tends to involve a lot of rubbing something your lashes definitely don’t need after a lift.

For Eyebrow Lamination

  • Cream-based eyeshadows or eyeliners with waxy textures – These products often include ingredients that can soften the effect of brow lamination, especially in the first few days post-treatment.
  • Stiff or high-drag brow pencils – Tools that require pressure can disrupt the direction and definition of laminated brows, making them look uneven or flat.
  • Heavy pomades or styling waxes – These may overpower the soft, flexible hold of laminated brows and break down the structured appearance that eyebrow lamination is designed to create.

What You Can Use

Oil-Free Mascara (Bottom Lashes Only)
This one’s more of a maybe. If you have to wear mascara, keep it strictly to the lower lashes and make sure it’s oil-free. Your top lashes already look fab post-lift, and anything extra might mess with that curl.

Water-Based Liners (Gel or Pen)
Go for water-based pens or gel liners that glide on without any tugging. They’re lighter, smudge-proof, and don’t cling to your lashes in a weird, clumpy way.

Eyeshadow Powders (Applied Softly)
Powders are your bestie here but treat your lids like delicate fabric. Use a fluffy brush, tap off excess, and apply gently. Like soft glam, not full-on smoky eye (at least for now).

Tinted Brow Gels with Flex
This is a solid workaround if you’re trying to fill in your brows without ruining the lamination. Look for gels with a lightweight formula that lets your brows stay lifted, not crusty.

Some of the Lash Boutique Artist-Approved Picks

  • Clinique Bottom Lash Mascara – oil-free, teeny wand, stays put.
  • Stila Stay All Day Waterproof Liquid Liner – water-based, glides on.
  • Glossier Boy Brow – flexible hold, no stiffness.
  • e.l.f. Wow Brow Gel – super affordable and doesn’t drag.
  • MAC Eyeshadow Singles – easy to blend, minimal fallout.

How to Apply Eye Makeup Without Compromising

Handle with Care
When applying or removing makeup, always be mindful of the delicate nature of your lash lift and eyebrow lamination. Avoid any vigorous rubbing or tugging—these treatments need gentle handling to maintain their shape and longevity. Think of your lashes and brows as fragile extensions of your skin that deserve a soft approach.

Focus on Precise Application
Applying eyeliner just above the lash line—not inside the waterline—helps prevent irritation and reduces the risk of product buildup that could weaken the lash lift or disrupt the brow lamination. This small adjustment in technique makes a significant difference in preserving your results.

Use Setting Techniques to Maintain Freshness
After you apply your eye makeup, setting it lightly with a translucent powder can keep everything in place throughout the day. This step minimizes creasing, smudging, and fading, so your eyes look polished longer without needing frequent touch-ups.

Protect the Shape of Your Laminated Brows
Touching up your laminated brows feels satisfying! We get it. But brushing them too often or too hard can squash that soft, lifted effect. Instead, just use a gentle hand and a spoolie brush to follow the natural shape your treatment created.

Keep Your Routine Consistent
A consistent, careful makeup routine not only keeps your look flawless but also helps extend the lifespan of your lash lift and eyebrow lamination. The less you disturb these treatments, the longer you get to enjoy those perfectly lifted lashes and well-groomed brows.

How to Gently Remove Eye Makeup

  • Use an oil-free micellar water or a remover that’s safe for lash lifts and laminated brows.
  • Go for a lint-free cotton pad or a flocked applicator (those work like magic with no fuzzies left behind).
  • Press the pad gently over your eyes. Don’t rub or swipe. Just let it sit for a few seconds and lift.
  • Avoid cotton balls as they shed fibers that cling to lashes and laminated brows.
  • If you’ve had a lash lift, the less friction, the better—treat your eye area like it’s fresh out of a salon.

Wrapping It Up!

Wearing eye makeup after a lash lift or brow lamination is totally possible as long as you care for your lashes and brows as the beauty assets they truly are. Treat them gently, and you’ll keep that fresh, lifted look going strong. At Lash Boutique, we’re dedicated not only to enhancing your beauty but also to maintaining it between appointments.

Need a touch-up? Thinking of trying that brow lamination you’ve been eyeing or a lash lift in Sarasota? Book your spot today and let’s keep those lashes lifted and brows on point. We’ve got you.